

Pockyt Whitelabel Checkout w/ SecurePay (YIP)
Introduction
This solution enables merchants to accept payments through a fully whitelabel checkout experience. Unlike the Hosted Checkout Page where customers are redirected to Pockyt's branded cashier page, the Whitelabel Checkout (YIP) integration allows the merchant to build and control the entire checkout UI.
The merchant system supports three key functions in this workflow:
- Customer Registration: The merchant backend registers the customer with Pockyt to obtain a unique
customerNoused for SecurePay transactions. - Whitelabel Checkout Initiation: The merchant calls SecurePay with
terminal: "YIP"to receive vendor-specific SDK initialization data instead of a hosted checkout URL. The merchant renders the vendor SDK on their own checkout page and the customer authorizes the payment directly within the SDK. - Transaction Confirmation: The payment status is confirmed via webhook notification or optional transaction query, allowing the merchant to finalize the order and update internal records.
Pre-requisitesAPI Credentials: Obtain
merchantNo,storeNo, and values from Pockyt.Webhook Configuration: Set up webhook URLs to receive asynchronous transaction updates.
Vendor SDK Access: Depending on the payment method, the merchant must integrate the corresponding vendor SDK on their frontend (e.g., Cash App Pay SDK, PayPal JS SDK, Venmo SDK). Contact your Pockyt Solutions representative for vendor-specific SDK documentation and demo files.
API Diagram
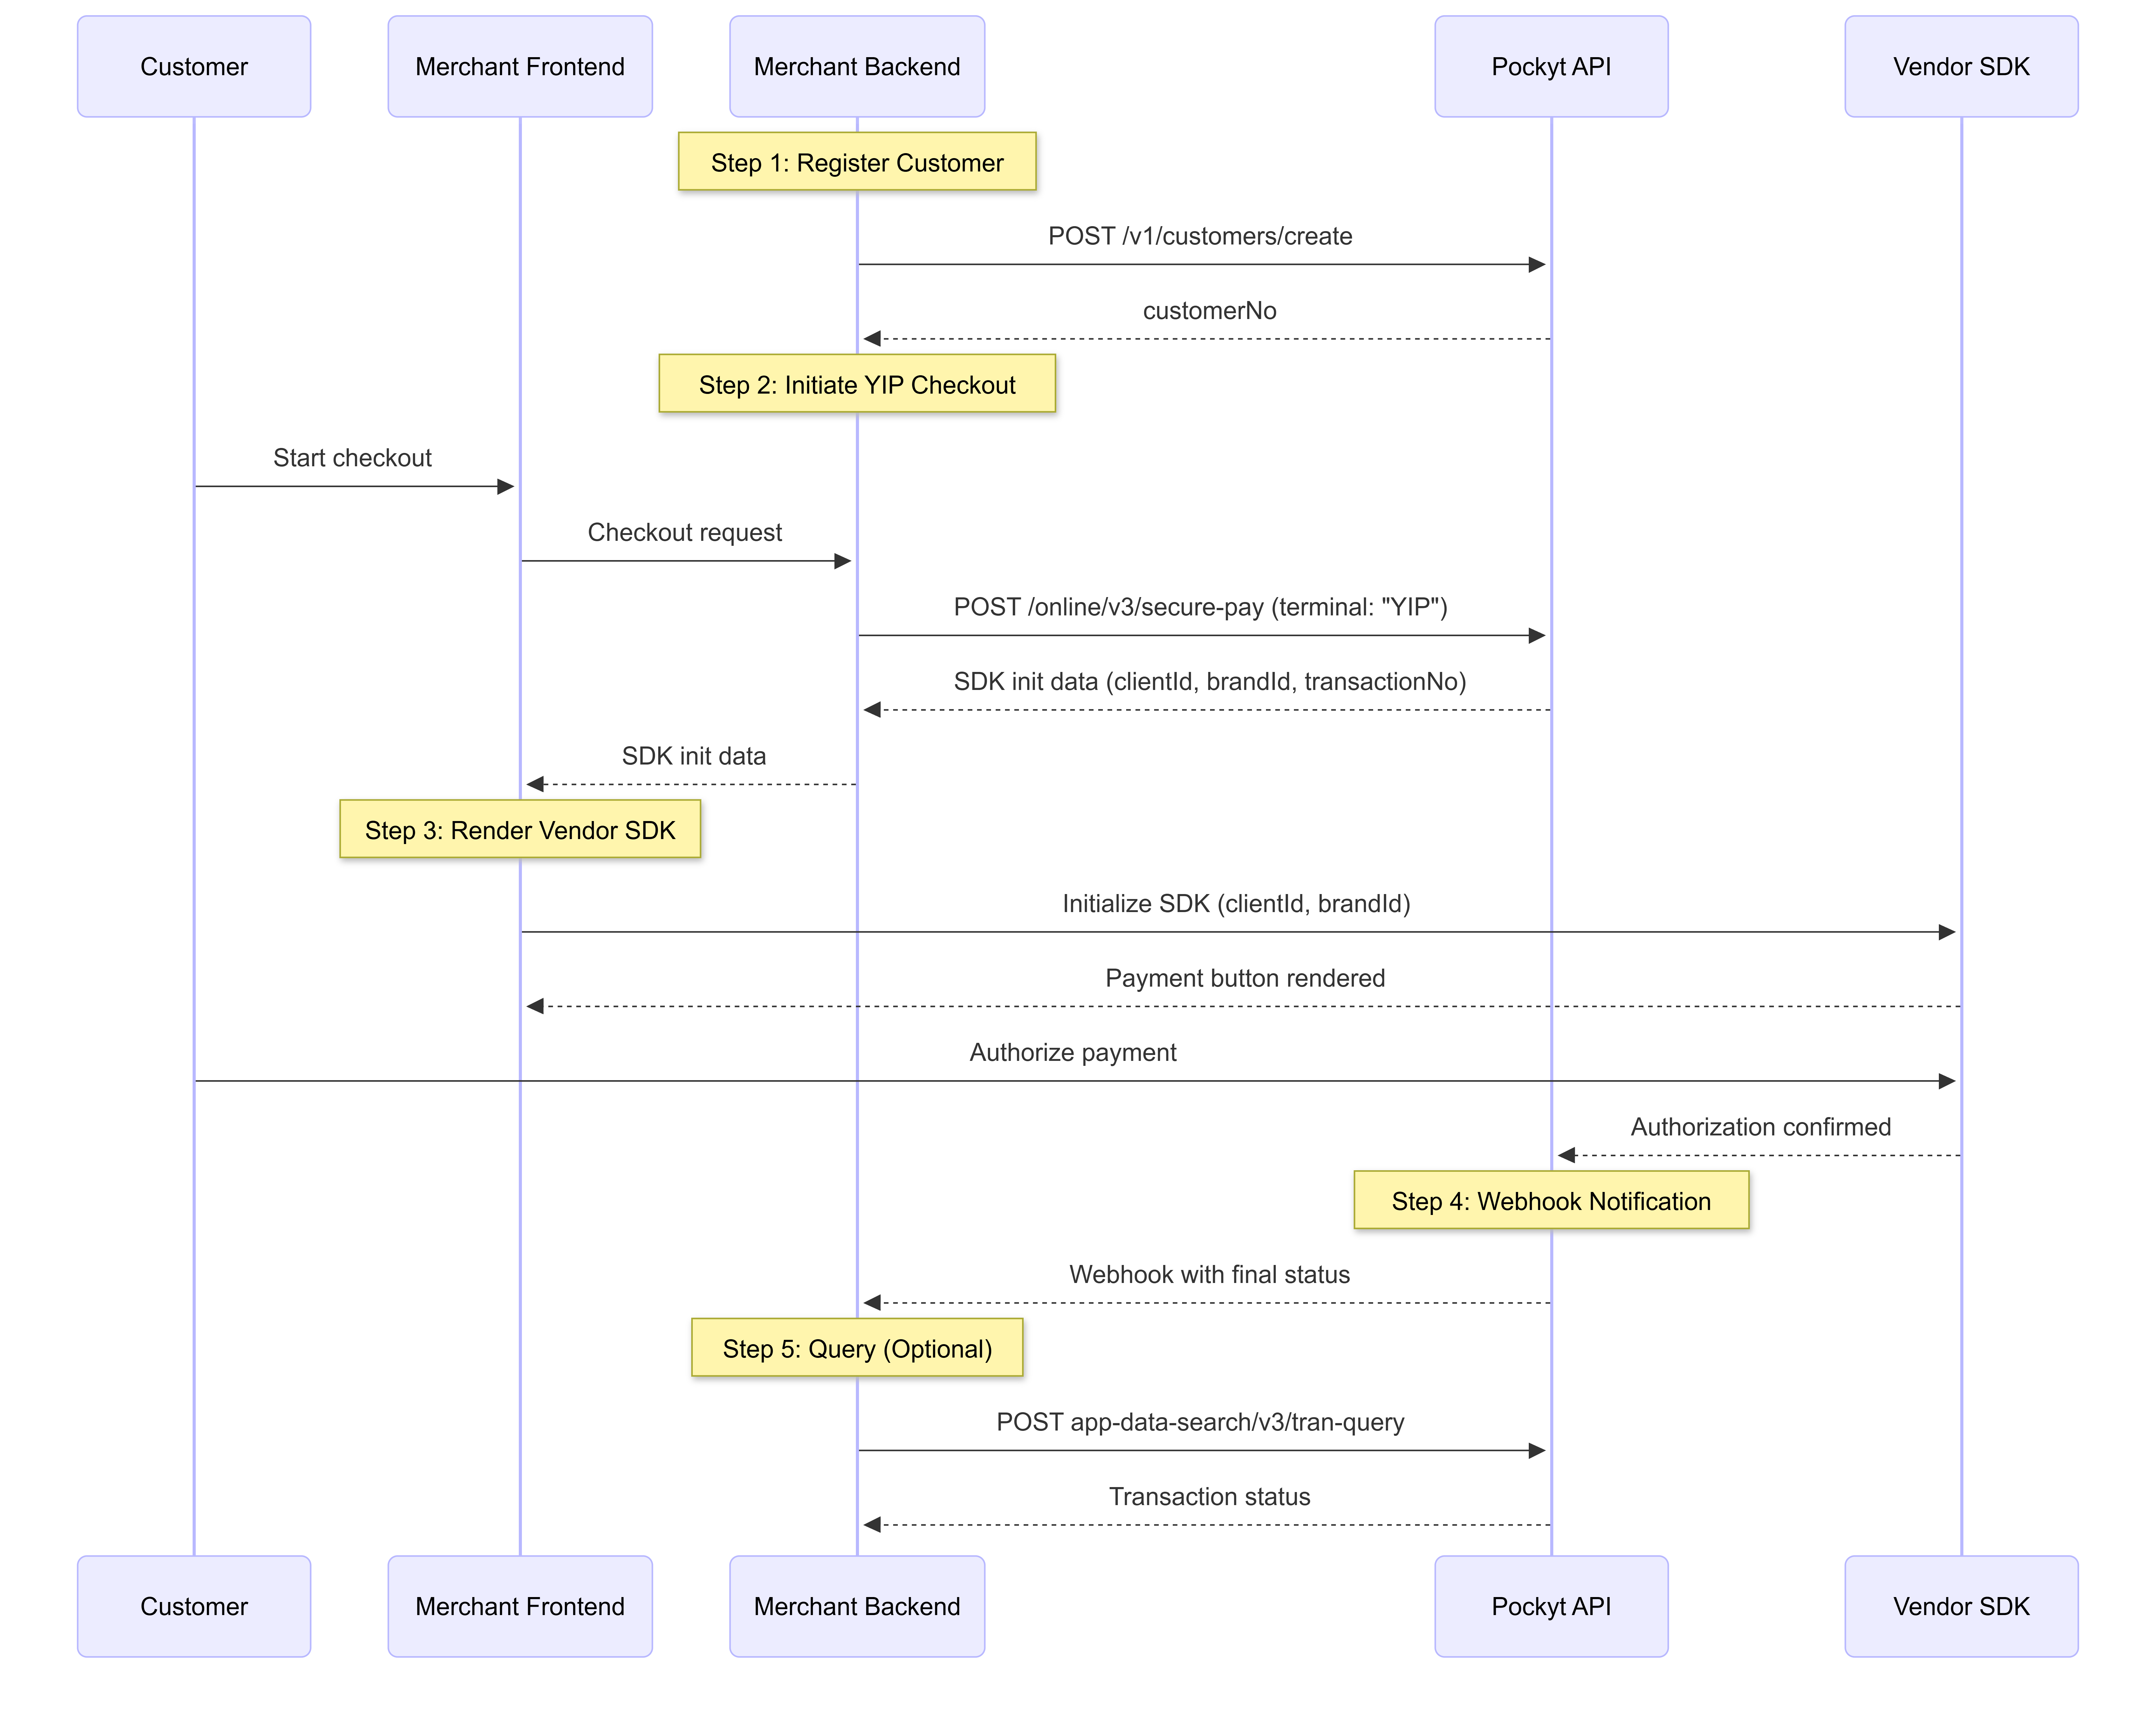
API workflow
API References for Endpoints in this Workflow:
- Step 1 Register Customer
- Step 2 Secure-pay
- Step 4 Handling Webhooks via IPN Url
- Step 5 Query Transaction Status
Step-by-Step Whitelabel Checkout (YIP) Workflow
Step 1: Register Customer
Action: The merchant backend registers the customer using the
POST /v1/customers/create endpoint.
This returns a customerNo that will be referenced in the SecurePay request.
Step 2: Initiate Whitelabel Checkout (YIP)
Action: The customer initiates a checkout session on the merchant's own checkout page.
- The merchant backend calls the
POST /online/v3/secure-payendpoint withterminal: "YIP". - The
creditTypeshould be set to"normal"for standard one-time payments. - For the
vendorparameter value, you can reference the following list vendor parameter. Common YIP-supported vendors includecashapppay,paypal, andvenmo. - Unlike the Hosted Checkout flow, the Pockyt API does not return a
cashierUrl. Instead, it returns vendor-specific initialization data that the merchant uses to render the payment UI on their own page.
Example Request (Cash App Pay):
{
  "amount": "100.00",
  "storeNo": "305209",
  "currency": "USD",
  "settleCurrency": "USD",
  "merchantNo": "204674",
  "callbackUrl": "https://merchant.com/payment-complete",
  "terminal": "YIP",
  "ipnUrl": "https://merchant.com/webhooks/pockyt",
  "reference": "order_20260330_001",
  "vendor": "cashapppay",
  "verifySign": "{{verifySign}}"
}
Example Response (Cash App Pay):
{
  "result": {
    "amount": "100.00",
    "clientId": "CAS-CI_POCKYT",
    "brandId": "BRAND_xxxxxxxxxxxxxxxxxxxxxxxx",
    "transactionNo": "301XXXXXXXXXXXXXXX",
    "currency": "USD",
    "creditType": "normal"
  },
  "ret_code": "000100",
  "ret_msg": "success"
}
Key Difference from Hosted Checkout: In the hosted flow, you receive acashierUrland redirect the customer. In the YIP flow, you receive SDK initialization parameters (likeclientIdandbrandId) and use them to render the payment experience directly on your page.
Step 3: Render Vendor SDK and Authorize Payment
Action: The merchant frontend uses the initialization data from Step 2 to render the vendor's payment SDK on their checkout page.
- Initialize the vendor SDK using the returned parameters. For example, Cash App Pay requires the
clientIdandbrandIdto render its payment button. - The customer interacts with the vendor SDK to authorize the payment (e.g., scanning a QR code, approving in the Cash App mobile application, or clicking a payment button).
- Once the customer authorizes, the vendor SDK communicates the authorization directly to Pockyt on the backend. The merchant does not need to make any additional API calls to finalize the payment.
- The merchant should wait for the webhook notification (Step 4) to confirm the transaction result before updating the order status.
Vendor SDK Documentation: Pockyt provides vendor-specific HTML demo files and SDK references for each supported payment method. Contact your Pockyt Solutions representative.
Step 4: Handle Webhook Notifications
Action: Pockyt sends a webhook to the merchant backend with the final transaction result.
- The webhook includes fields such as transaction number, status, and amount.
- The merchant should listen for this webhook on the URL defined in the
ipnUrlparameter of the original request.
Payments should only be considered complete after a"success"status is received via webhook or confirmed manually.
Step 5: (Optional) Query Transaction Status
Action: If webhook confirmation is delayed or not received, the merchant may query the transaction status using
POST app-data-search/v3/tran-query.
Use Case: This endpoint retrieves the transaction status using the original transaction number.
Supported Vendors for YIP
The following payment vendors support the YIP whitelabel integration. Contact your Pockyt Solutions representative to confirm vendor availability for your account:
| Vendor | vendor Parameter | SDK Type |
|---|---|---|
| Cash App Pay | cashapppay | Cash App Pay SDK (Web/Mobile) |
| PayPal | paypal | PayPal JS SDK |
| Venmo | venmo | Venmo via Braintree SDK |
| Apple Pay | applepay | Apple Pay JS API |
For the full list of supported payment methods and vendor parameters, see Available Payment Methods.
Key Considerations
-
Vendor SDK Demo Files: When integrating a specific vendor, request the HTML demo file from your Pockyt Solutions representative. These files contain working examples of SDK initialization and payment authorization flows for each vendor.
-
Error Handling: A
ret_codeof000100indicates success on all Pockyt API responses. Handle errors consistently and implement retry logic for transient failures. -
Idempotency: Use unique
referencevalues for each transaction to prevent duplicate charges. See Idempotency Key for details.
Updated 5 months ago