Payouts to Bank Accounts
This guide details a step-by-step implementation of payouts to bank accounts in USD.
Introduction
This guide covers how to use Integrated Payouts to send USD to bank accounts with the non-Pockyt wallet configuration. For other configurations, payout methods, and currencies, please contact the solutions team at [email protected] to get setup.
Prerequisites
- Merchant Account Setup – Ensure the merchant has an active Pockyt account.
- API Credentials – Obtain
merchantNo,storeNovalues from Pockyt.- Webhook Configuration – Set up
ipnUrlto receive transaction status updates.- Banking Requirements – Ensure the payee’s bank supports ACH transfers.
- Regulatory Compliance – Merchants must adhere to Know Your Customer (KYC) and Anti-Money Laundering (AML) regulations. It is important that the merchant has been approved by Pockyt's compliance team for this service. If you have any questions, reach out to [email protected] or contact your sales representative.
API Workflow
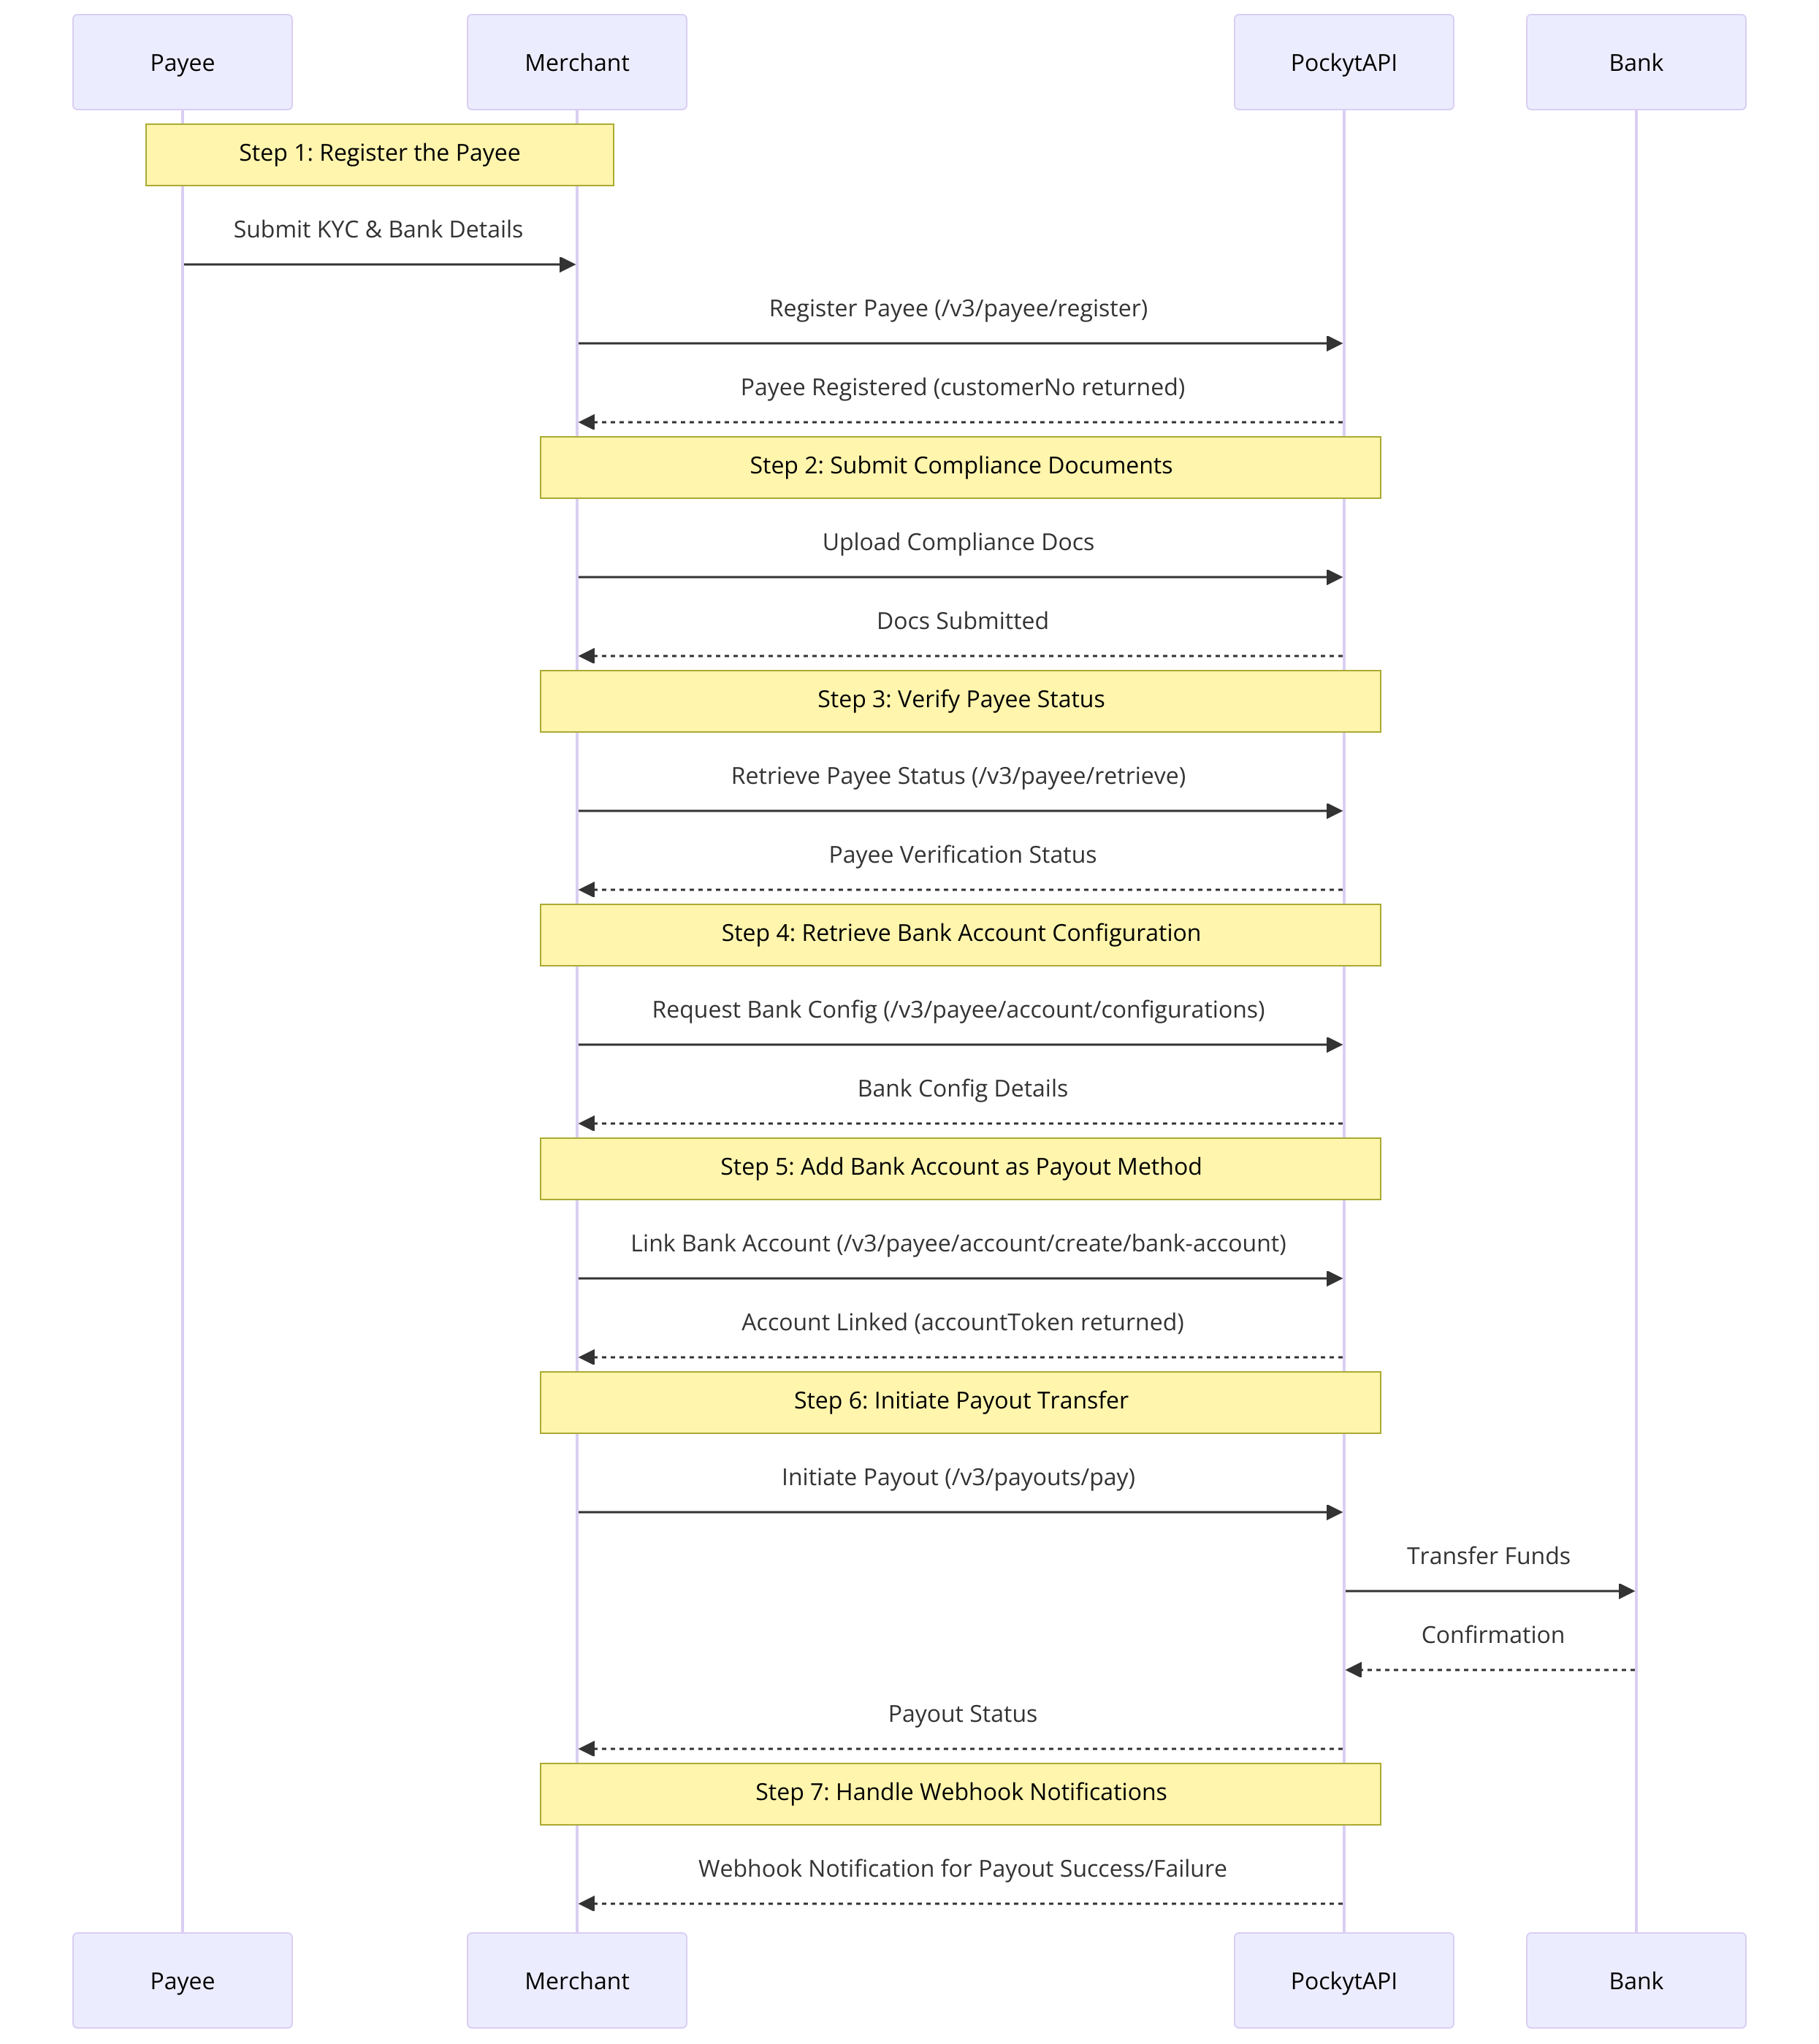
Step-by-Step Breakdown of the Payout Workflow
API References for Workflow Steps
- Step 1: Register Payee /v3/payee/register
- Step 2: Submit Compliance Documents
- Step 3: Check Payee Status /v3/payee/retrieve
- Step 4: Retrieve Bank Configuration /v3/payee/account/configurations
- Step 5: Add Bank Account as Payout Method /v3/payee/account/create/bank-account
- Step 6: Execute Payout /v3/payouts/pay
- Step 7: Handle Webhook Notifications
Step 1: Register Payee
Action: The merchant registers a payee in Pockyt’s system to generate a customerNo. This identifier is required for all subsequent payout steps.
Key Considerations:
- The
profileType(INDIVIDUAL or BUSINESS) determines the required fields. - The payee’s email and governmentId must be unique.
- The
customerNoreturned here is needed in Step 5 and Step 6.
Step 2: Submit Compliance Documents
Action: Merchants must submit identity verification documents (e.g., W9 forms, SSN, passport) for compliance review.
Key Considerations:
- Payee accounts are initially set to ACTIVE upon creation. However, certain trigger events in compliance reviews may change their status to PENDING or DECLINED.
- It is crucial for the merchant to verify the payee’s status before initiating a payout to ensure funds are not sent to an ineligible payee.
Step 3: Verify Payee Status
Action: Query the /v3/payee/retrieve endpoint to confirm if the payee is ACTIVATED for payouts.
Key Considerations:
- If the status is PENDING, the payee may be under additional compliance review.
- If the status is DECLINED, additional documents may be required.
- Payee status can change dynamically based on compliance requirements, so always check status before payouts.
Step 4: Retrieve Bank Account Configuration
Action: Call /v3/payee/account/configurations to retrieve required parameters for linking a payee’s bank account.
Key Considerations:
- This is a data service for developers, ensuring they retrieve the most up-to-date banking requirements for different countries and currencies.
- The international banking system is in constant flux, with compliance requirements varying based on jurisdiction and regulation.
- Pockyt provides this service so developers always have access to the correct fields needed to register a payee’s bank account without requiring manual updates.
Example API Response:
[
  {
    "profileType": "INDIVIDUAL",
    "accountType": "BANK_ACCOUNT",
    "accountCurrency": "USD",
    "accountCountry": "US",
    "fields": [
      {
        "isRequired": false,
        "minLength": 2,
        "name": "country",
        "label": "The payee country code",
        "maxLength": 2
      },
      {
        "isRequired": true,
        "minLength": 1,
        "name": "bankAccountName",
        "label": "Account Holder Name",
        "maxLength": 64
      },
      {
        "isRequired": true,
        "minLength": 1,
        "name": "bankAccountId",
        "label": "Bank Account Number",
        "maxLength": 64
      },
      {
        "isRequired": false,
        "minLength": 1,
        "name": "addressLine1",
        "label": "Beneficiary address",
        "maxLength": 64
      },
      {
        "isRequired": false,
        "minLength": 1,
        "name": "postalCode",
        "label": "The payee zip",
        "maxLength": 64
      },
      {
        "isRequired": false,
        "minLength": 2,
        "name": "stateProvince",
        "label": "The payee state",
        "maxLength": 64
      },
      {
        "isRequired": false,
        "minLength": 1,
        "name": "city",
        "label": "The payee city",
        "maxLength": 64
      },
      {
        "isRequired": true,
        "minLength": 1,
        "name": "bankCode",
        "label": "Routing Number",
        "maxLength": 64
      }
    ]
  }
]- The fields in this response provide the necessary parameters required to register a bank account for a payee.
- Required fields (e.g.,
bankAccountName,bankAccountId,bankCode) must be extracted and included in the request body of Step 5. - Different jurisdictions may require additional fields, so developers should always query this endpoint before submitting bank account details.
Step 5: Add Bank Account as a Payout Method
Action: Register the payee’s bank account using /v3/payee/account/create/bank-account.
Key Considerations:
- The
customerNofrom Step 1 is required in this request. - Bank Account Name must match the payee’s name exactly to avoid rejection.
- Ensure
accountTypeis set correctly (CHECKINGorSAVINGS). - The response returns an
accountToken, which serves as the payment token for this payout method. - This
accountTokenmust be included in Step 6 to execute the payout. - Example accountToken:
2010378298556879970563
Step 6: Initiate Payout Transfer
Action: Execute a payout to the payee’s bank account via /v3/payouts/pay.
Key Considerations:
- The
customerNofrom Step 1 and theaccountTokenfrom Step 5 are required. - Ensure
amountdoes not exceed the merchant’s available balance. - The
invoiceIdshould be unique to avoid duplicate payouts. - The
ipnUrlis critical for receiving transaction updates. - This API request only confirms Pockyt received the payout request—it does not confirm that the funds have been deposited.
- The actual payout status must be checked via webhook notifications, as banking transactions process asynchronously.
Step 7: Handle Webhook Notifications
- Action: The webhook is triggered once the customer accepts the billing agreement in the checkout UI. However, the payment method has not been charged yet.
- Purpose: The webhook contains the transactionNo, which is required for charging the payment method in the next step via the /process API. It also includes the vaultId, which should be saved for future use, though it is not fully activated until the /process API is called.
- See Example Webhook Notification Body Here
Key Considerations:
- The initial API response in Step 6 does not confirm that the payout has been completed.
- Webhook notifications will indicate whether the payout is pending, successful, or failed.
Key Notes for Implementation
-
Parameters Flow:
customerNo: Generated in Step 1, used in Steps 2, 5, and 6.accountToken: Generated in Step 5, required in Step 6 to execute the payout.transactionNo: Generated in Step 6, used in Step 7 for webhook tracking.
-
Payout Processing Logic:
- The payout request in Step 6 does not immediately transfer funds—it only queues the transaction.
- The actual fund transfer depends on bank processing times and clearing systems.
- Merchants must always rely on webhook notifications (Step 7) for final payout confirmation.
-
Webhook Notifications:
- Webhook notifications are crucial for confirming the status of transactions in Step 7.
- Ensure the Webhook Listener processes the
transactionNoand status fields properly to track payout completion.
For additional assistance, contact [email protected].
Updated about 1 year ago