Merchant Presents Mixed QRC
This guide outlines the process of integrating the Merchant Presents QRC workflow to enable secure, QR code-based payment processing.
This guide provides step-by-step instructions for integrating the Mixed QRC API into an in-store POS system to enable QR code-based payments across multiple wallets (e.g., Alipay, WeChat Pay, etc.) using a single QR code.
In this flow, the POS system generates a mixed QR code linked to a unique transaction. The customer scans the code using their preferred supported wallet to complete the payment. The POS system handles the following key tasks:
- Mixed QR Code Generation: The POS calls the generateMixedCode API to create a transaction-specific QR code that is displayed to the customer.
- Webhook Handling: The POS listens for webhook notifications from Pockyt (if configured) to receive real-time updates on the transaction status.
- Transaction Verification: The POS can call the mixedQuery API to confirm the transaction status using the recordNo or reference identifier.
Pre-RequisitesAPI Credentials:
merchantNoandapiToken.POS Setup: A customer-facing display capable of showing images or HTML content.
API Diagram
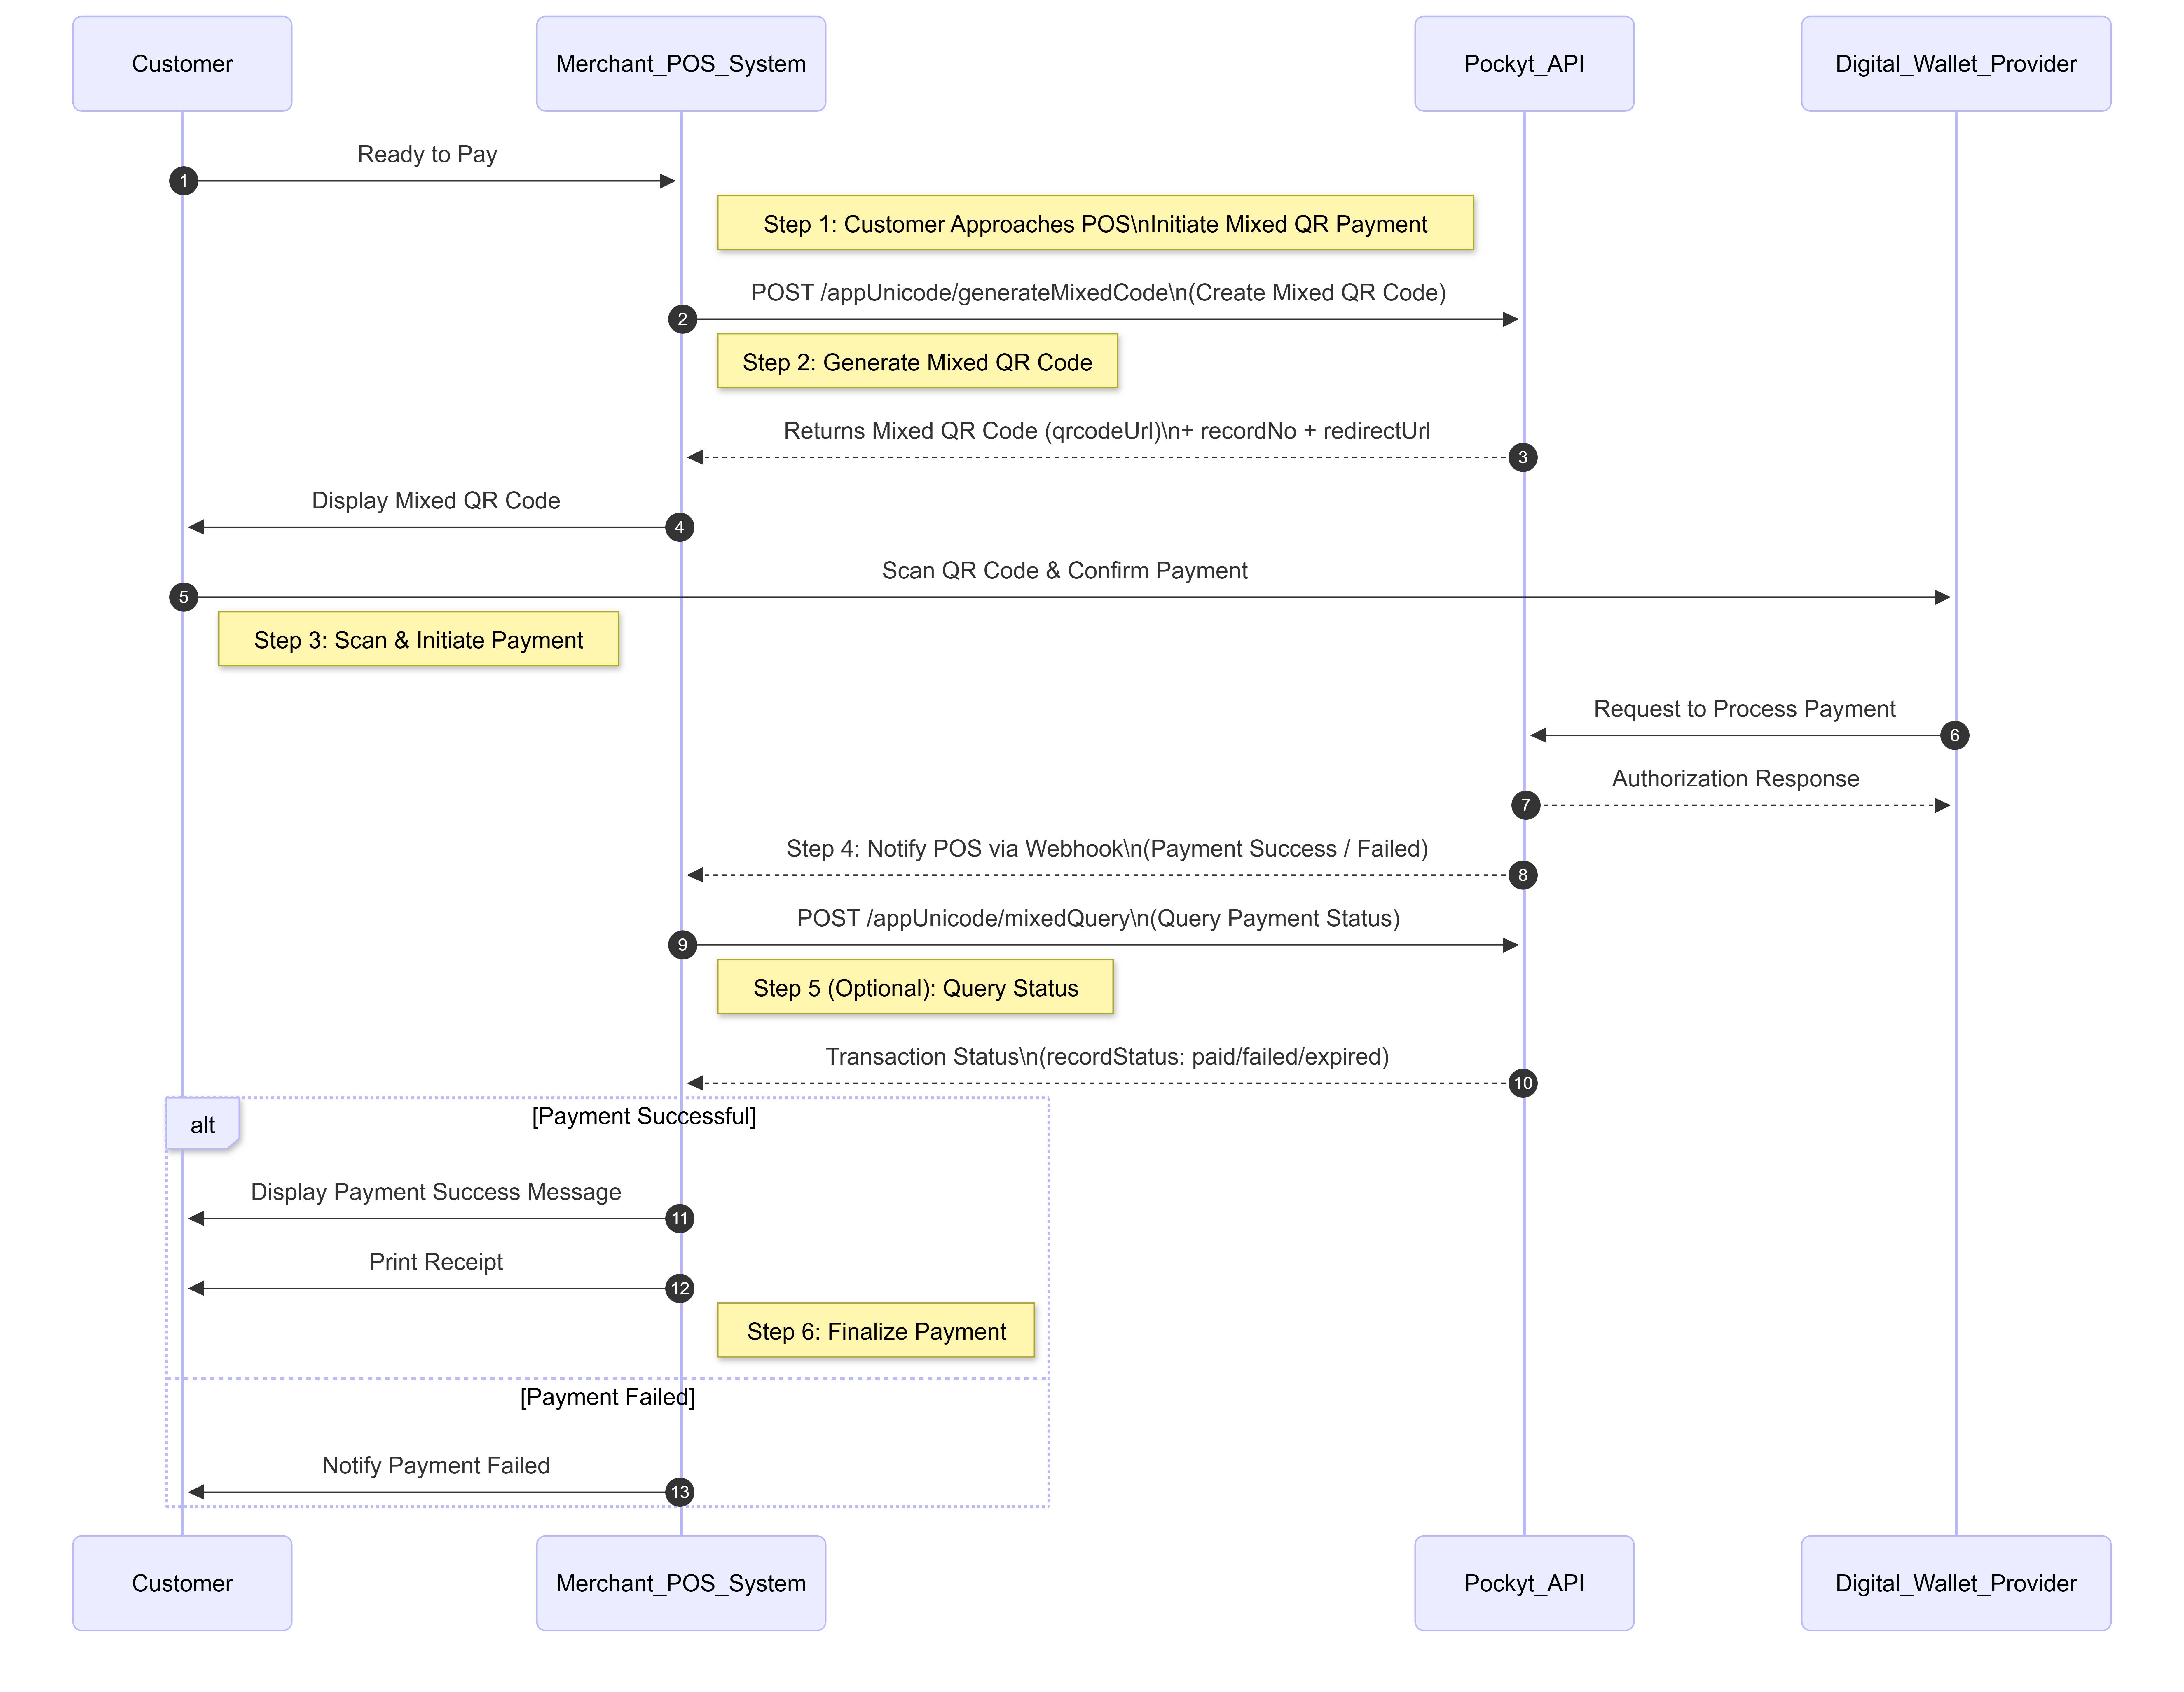
Step-by-Step In Store Payments Workflow
Step 1: Customer Approaches POS
Action: The customer indicates they are ready to pay using their digital wallet (e.g., Alipay, WeChat Pay, etc.). The cashier selects Mixed QRC option on the POS to initiate the transaction.
Step 2: Generate QR Code
Action: The POS system calls the Pockyt API to generate a QR code that the customer can scan to initiate payment.
API Endpoint: POST /appUnicode/generateMixedCode
Description: This endpoint returns a unique QR code and recordNo that the customer will use to make the payment via their digital wallet. The POS displays the QR code on a customer-facing screen.
Key fields:
saleAmount(BigDecimal, Required) – Transaction amount.tax(BigDecimal, Required) – Tax amount.needTip(String, Required) –"true"/"false"; whether tipping is enabled.needQrcode(String, Required) –"true"/"false"; whether the API should generate a QR code image.timeout(Integer, Optional) – Timeout in minutes before the mixed code expires.
Request body
{
  "merchantNo": "200043",
  "externalStoreId": "123",
  "saleAmount": "0.01",
  "tax": "0.00",
  "currency": "USD",
  "settleCurrency": "USD",
  "needTip": "false",
  "timeout": "5",
  "needQrcode": "true",
  "reference": "test2025121207",
  "verifySign": "891a0ddb3c8f7f6068f48be5dc6b842f"
}
Response body
{
  "result": {
    "currency": "USD",
    "qrcodeUrl": "https://yuansferstorage.azureedge.net/images/mixedQrcode/ec/v1_tranqrcode_754663045204776494747.jpg",
    "recordNo": "297992238443467709",
    "redirectUrl": "https://page.yuansfer.com/appTransaction/mixed-297992238443467709/unicode-create",
    "reference": "test2025121207",
    "saleAmount": "0.01",
    "settleCurrency": "USD",
    "tax": "0.00",
    "timeout": "5",
    "tip": "0.00"
  },
  "ret_code": "000100",
  "ret_msg": "generate success"
}Pos Behavior
- Store
recordNo(and optionallyreference) in your transaction record.- Load and display
qrcodeUrlon a customer-facing screen until the transaction completes or the timeout is reached.
Step 3: Customer Scans QR Code and Confirms Payment
Action:
- The customer opens their supported wallet app (e.g., Alipay, WeChat Pay, etc.).
- They scan the mixed QR code displayed on the POS.
- The wallet app loads the associated payment page details.
- The customer reviews the transaction details and confirms the payment.
Step 4: Handle Webhook Notifications
Action: Once the payment is processed, the Pockyt API sends a webhook notification to the POS system with the payment result.
- The webhook contains the final transaction status.
- The POS should listen for this webhook and update the transaction record accordingly.
Step 5: (Optional) Query Transaction Status
Action: If the webhook is delayed or not received, the POS can query the transaction status manually.
API Endpoint: POST /appUnicode/mixedQuery
Description:
You can query using either:
recordNoreference
just one of them must be provided, along with your credentials and verifySign.
Key fields:
recordNo: Record number returned by generateMixedCode.reference: Your internal reference if used in Step 2.
Request body
{
    "merchantNo":"200043",
    "externalStoreId":"123",
    "recordNo":"298001159781596480",
    "verifySign":"606a0c31e9808990b093b5d06c2f3d7e"
}
Response body
{
	"result": {
		"amount": "0.01",
		"createTime": "2025-12-12T11:15:08+08:00",
		"currency": "USD",
		"recordStatus": "paid",
		"saleAmount": "0.01",
		"settleCurrency": "USD",
		"tax": "0.00",
		"timeout": 5,
		"tip": 0,
		"transactionNo": "298291444591258733"
	},
	"ret_code": "000100",
	"ret_msg": "query success"
}POS behavior
- Poll mixedQuery until
recordStatusis in a final state (paid, canceled, expired, or failed), or until your owntimeoutis reached.- Only treat the transaction as successfully paid if
recordStatus= "paid".
Step 6: Complete Transaction and Print Receipt
Action: Once payment is confirmed (via webhook or status query):
- The POS finalizes the transaction internally.
- A receipt is generated and either printed or sent digitally to the customer.
- The customer receives a confirmation notification from their digital wallet provider.
Updated 2 months ago